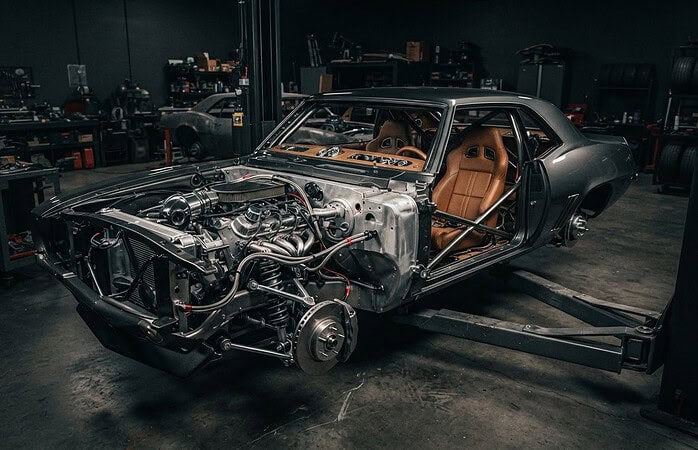

What if the rust you can see is the least of the problem? On a classic car, a blister beneath the paint can point to corrosion spreading through a seam, floor pan, rocker panel, or frame rail. The classic car rust repair process starts by finding the full extent of the damage, not simply covering the visible mark.
Rust removers, converters, primers, and protective coatings can all have a place in a repair, but they do different jobs. None can replace metal that has corroded too deeply to remain sound. Lasting results depend on assessing the damage first, then choosing the right repair and protection in the right order.
This guide follows the work from inspection and damage assessment through metal repair and corrosion protection. You’ll learn how surface rust differs from perforation or structural damage, what removal and prevention methods are designed to do, and which details help define the scope of bodywork on a classic build. That understanding can make planning a custom restomod clearer, so the finished car honors its heritage and is ready to be driven.
Key Takeaways
- The classic car rust repair process should be guided by the condition of the metal, not the size or appearance of the visible rust patch.
- Assess affected areas and plan access before choosing how to remove corrosion or repair damaged metal.
- Rust removers, converters, primers, and protective coatings serve different purposes. A coating cannot repair deeper metal damage.
- Use inspection findings to define bodywork before finish work and broader custom-build decisions begin.
- After repair, check for paint chips, deteriorating seams, trapped moisture, and damaged coatings to catch potential problems early.
Classic car rust repair process: how to judge what the corrosion means
A proper classic car rust repair process assesses the damage, removes corrosion, replaces metal that can no longer do its job, and protects the sound surface that remains. The order matters. A rust-colored mark may be limited to the surface, or it may be the visible edge of deterioration spreading beneath paint, into a seam, or through a panel.
Rust forms as iron reacts with oxygen and moisture. A brief overview of What is Rust? explains why damp, poorly ventilated areas are vulnerable. But appearance alone can’t reveal how much metal remains. Paint may hide corrosion until it blisters or flakes, while undercoating and old repairs can conceal it longer. Assess the location, extent, and condition of the metal, not just the finish.
How to recognize surface rust, pitting, and perforation
Light surface rust may appear as thin discoloration on otherwise intact metal. Bubbling paint, flaking edges, staining, and roughness suggest corrosion has advanced beneath the finish. Pitting is more than a change in color: it indicates metal has been eaten away, leaving small depressions. Inspect the area closely before preparing it for refinishing.
Perforation means corrosion has created holes. Metal can also be weakened without an obvious opening, especially around areas that support the vehicle’s structure. That requires a different assessment from light surface rust. A coating may improve appearance, but paint over active corrosion doesn’t restore lost thickness or strength. It hides the evidence while the underlying damage remains.
Where classic-car corrosion can stay hidden
Look closely at panel seams, lower body sections, floor pans, and metal behind trim. These areas can collect moisture or debris, and overlapping panels and concealed surfaces make corrosion harder to spot from outside. Paint and undercoating may disguise changes in texture. A previous cosmetic repair can also make the surface look more complete than the metal beneath it.
Before disassembly or refinishing, record suspected areas with clear notes and photographs. Include each area’s position on the car and the visible signs. This creates a useful reference when access improves and lets you compare initial observations with the exposed metal. As findings shape the scope and sequence of bodywork within a larger build, they can inform planning through the custom build process.
The key distinction is not simply how much rust is visible. Consider whether the affected metal is still sound, whether corrosion extends beyond the exposed face, and whether the area has a structural role. That judgment sets the direction for repair: preserve and prepare intact metal, or address compromised material before moving toward a durable finish.
The classic car rust repair process, from inspection to sound metal
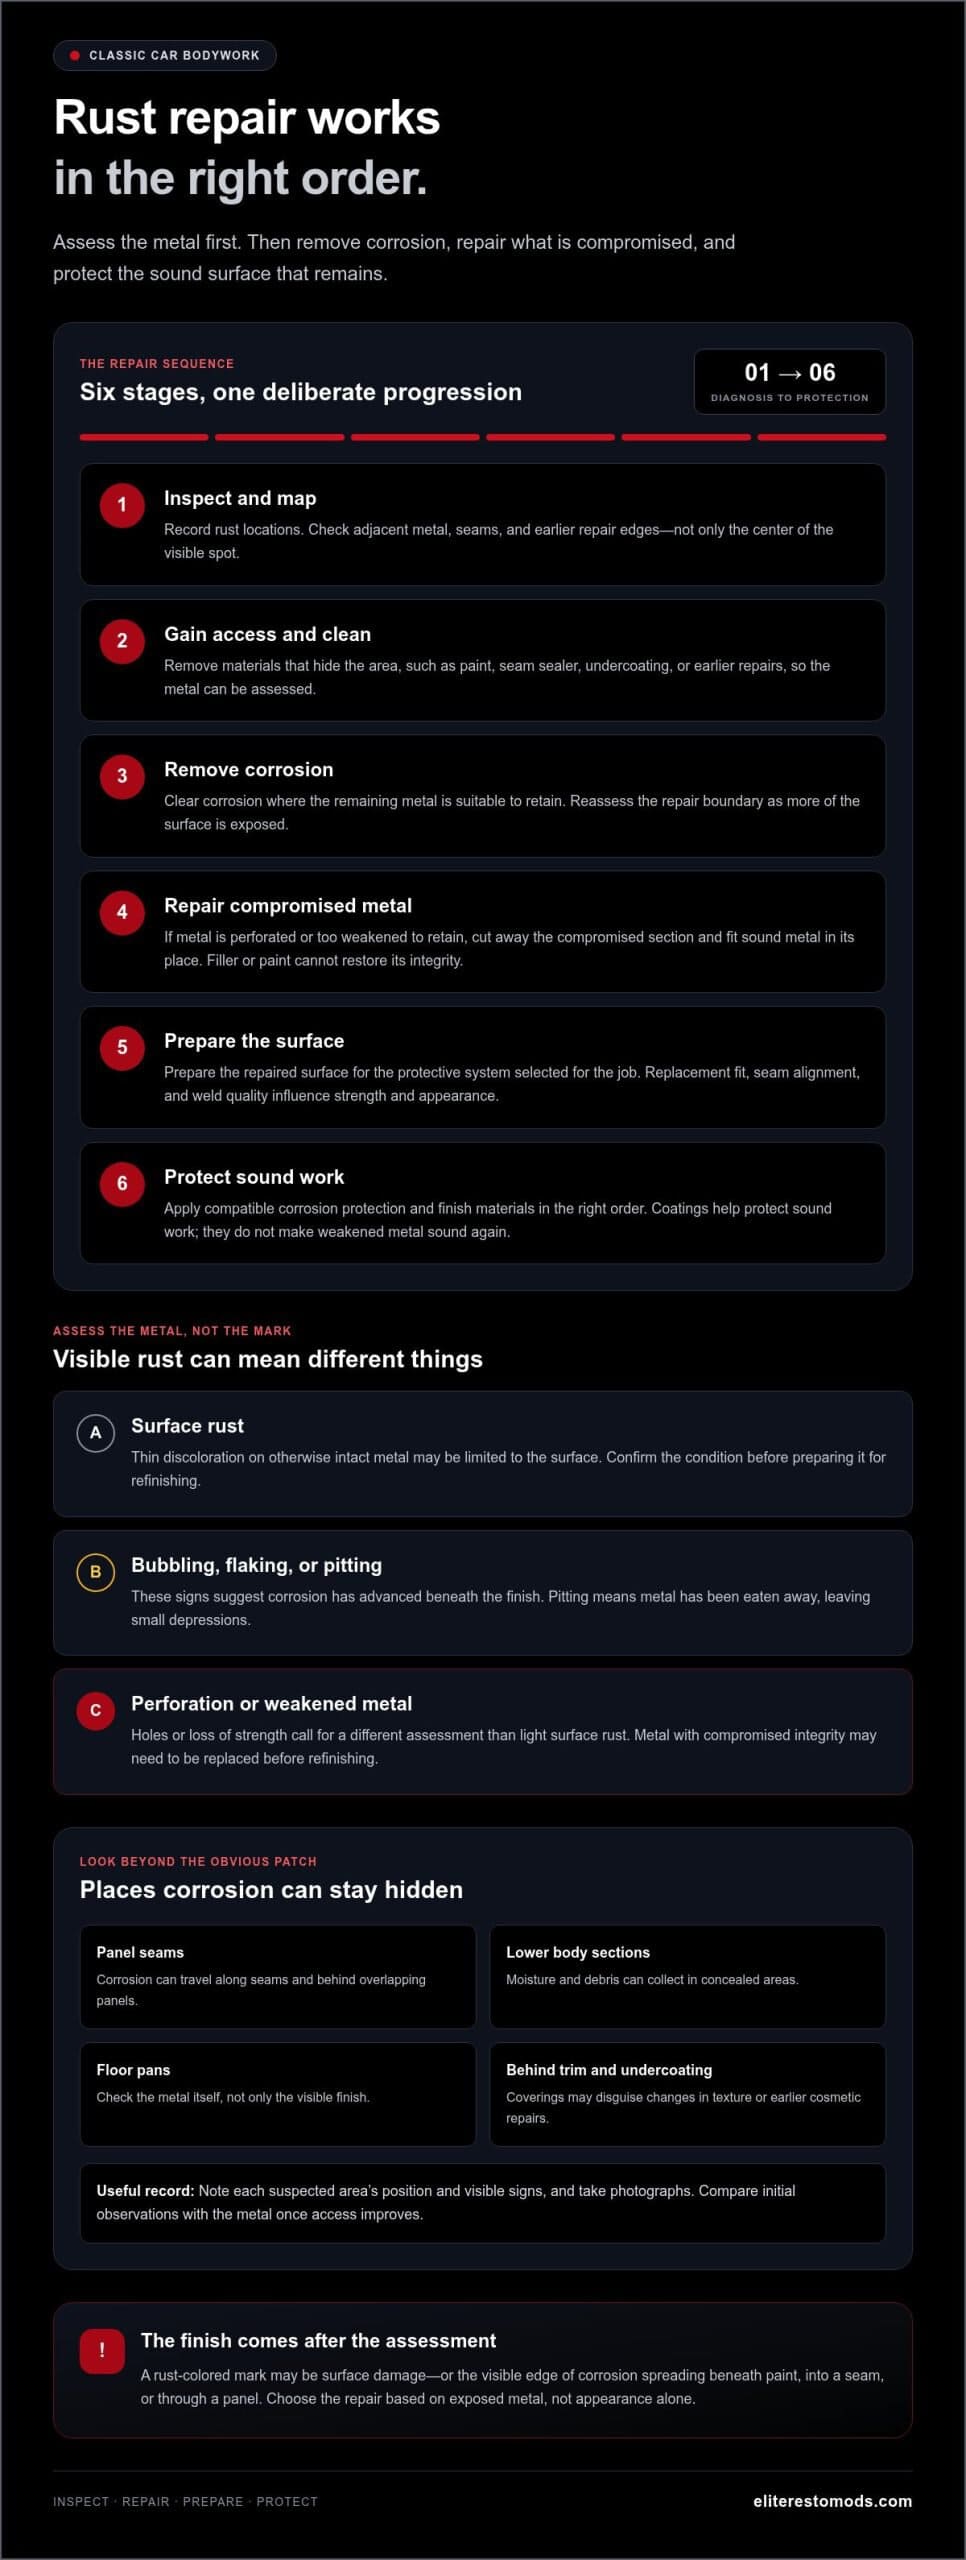
A reliable repair moves from diagnosis to protection in a deliberate sequence: inspect the affected area, gain access and clean it, remove corrosion, repair or replace compromised metal, prepare the surface, then apply suitable protection. Each step depends on what the metal can still support. A smooth-looking panel isn’t necessarily sound, and visible corrosion doesn’t always mean the entire panel must be replaced.
Think of the work as a series of decisions, not a single treatment. Record rust locations and examine nearby panels before selecting a method. Then expose enough of the area to understand the damage. Paint, seam sealer, undercoating, and earlier repairs can mask corrosion, so stripping a surface may reveal that the affected area extends beyond the original blemish. The right way to gain access depends on the vehicle, its construction, and the material being uncovered.
- Inspect: Map affected areas and check adjacent metal, seams, and repair edges.
- Access and clean: Remove materials that obscure the area so its condition can be assessed.
- Remove corrosion: Clear corrosion where the remaining metal is suitable to retain.
- Repair metal: Replace sections that have lost their integrity.
- Prepare: Leave the repaired surface ready for the chosen protective system.
- Protect: Apply compatible corrosion protection and finish materials in the right order.
Inspect, expose, and map affected areas
Check what lies beside the visible damage, not just the center of the rust spot. Corrosion can travel along seams or extend behind trim and into a neighboring section. As coatings are removed, reassess the boundary instead of assuming the first outline shows the full repair area. Choose the repair approach based on the exposed metal, not a fixed preference for sanding, chemicals, or blasting. Repairing Major Car Rust also discusses the distinct demands of significant corrosion.
Remove or replace damaged metal before refinishing
Where corrosion is limited and the metal remains suitable, removal can leave a surface ready for preparation. Deep deterioration is different. If metal is perforated or too weakened to retain, cut away the compromised section and fit sound metal in its place. Covering it with filler or paint won’t restore integrity. The fit of the replacement panel, alignment at its seams, and quality of the welds all influence the repair’s strength and appearance.
Apply coatings after assessing the corrosion and repairing the metal. Protection can preserve sound work, but it can’t make weakened metal sound again. In a custom build that includes bodywork, this sequence connects the condition of the shell to finish and build decisions. Elite Restomods’ custom build process reflects that broader planning approach.
Rust removal, conversion, and coatings: compare what each treatment does
Removal, conversion, and protection are separate jobs. In the classic car rust repair process, the right choice depends on what inspection reveals, how accessible the affected metal is, and whether it remains sound. A rust converter or protective coating can’t replace steel lost to corrosion. Don’t choose a product just because its label suggests it can do several things at once.
Use this comparison to understand each treatment’s role in the sequence. It’s a guide to function, not a product prescription. The manufacturer’s current instructions determine suitable surfaces, preparation, compatibility, application, and curing.
| Treatment | Purpose and suitable condition | Limitations and sequence |
|---|---|---|
| Mechanical removal | Abrasive methods such as sanding or other mechanical preparation remove corrosion and coatings from accessible surfaces. The approach can be adjusted to the panel shape and area being treated. | Access and corrosion depth matter. A method that cleans a broad, open panel may be unsuitable for a tight seam or intricate contour. It removes material, so it cannot restore metal that has already deteriorated. Use during corrosion removal, before surface preparation. |
| Chemical removal | Rust-removal products are intended to dissolve or lift corrosion from surfaces suitable for that product. They may be useful where access, shape, or the repair setup makes a chemical approach appropriate. | Products differ in use and surface requirements. Follow the current label for application and any required cleanup. Don’t assume a treatment reaches hidden corrosion or leaves a paint-ready surface. Use for removal before preparation and protection. |
| Conversion products | A converter is designed to react with remaining rust and leave a treated surface, but only where the product instructions allow its use. | It isn’t a substitute for removing corrosion when removal is required, or for cutting out and replacing metal that has lost integrity. Use it only at the stage specified by the product, after assessing the metal’s condition. |
| Primers and protective coatings | Primers support paint adhesion and corrosion protection; subsequent coatings provide a protective finish. They follow repair and preparation. | They protect appropriately prepared metal, not weakened or perforated sections. Confirm compatibility across products and follow current surface-preparation and curing instructions. |
Choose the method for the surface, not the label
Mechanical and chemical removal are not interchangeable shortcuts. A broad, accessible area may allow one kind of preparation, while a shaped section or difficult-to-reach location may call for another. Deep pitting also changes the decision: removing corrosion is not the same as retaining metal that is no longer sound. Assess the exposed surface before moving on.
Convert only where instructions allow
Converters, primers, and coatings have distinct roles. A converter addresses residual rust only on surfaces and under conditions its manufacturer permits. A primer and finish coating provide later layers of protection, but neither repairs metal loss. Before combining products, verify compatibility and follow current directions for preparation, application, and curing. The finish is only as dependable as the repaired metal beneath it.
Prevent rust from returning after classic car body repair
A fresh finish can make a classic look complete, but lasting protection depends on the repair beneath it. Sound metal, careful surface preparation, properly treated seams, and compatible coatings all matter. The classic car rust repair process doesn’t end when the paint cures; preserving the result means paying attention to areas where moisture can collect and protective layers can be damaged.
Road use exposes a car to water, dirt, and debris. A stone chip can break the paint barrier, while a deteriorating seam or damaged underbody coating can let moisture reach metal. Small changes are easier to assess before corrosion spreads, so inspect repaired areas as well as the visible finish.
Keep repaired surfaces and seams protected
Check paint chips and scratches promptly, especially where bare metal may be exposed. Look along panel seams, around joints, and at drain paths, where debris or blocked drainage can hold moisture against the body. Enclosed sections deserve attention too, since corrosion can develop out of sight. A clean exterior doesn’t mean every hidden surface is dry or protected.
Coatings vary in intended use and maintenance requirements. Follow the selected manufacturer’s current instructions for inspection, care, and reapplication rather than relying on a universal schedule. If a coating is cracked, peeling, or separating at an edge, document the location and assess what lies beneath before covering the defect.
Build a practical inspection routine
After driving on wet or dirty roads, clean and dry the car, then look over vulnerable areas. Check for fresh chips, bubbling, staining, seam deterioration, debris around drains, and damage to underbody coatings. There’s no single inspection interval that suits every classic: driving frequency, storage conditions, and exposure all influence how often closer attention makes sense.
Keep a simple record of repaired areas, new marks, and changes over time. A dated note and photograph can help distinguish an old blemish from fresh deterioration and make follow-up assessment more precise. If you find trapped moisture or accumulated dirt, address the source where practical. Coating over a damp or contaminated surface can undermine the protection it’s meant to provide.
Storage is part of preservation, not a substitute for repair or inspection. A dry, controlled environment can reduce exposure to fluctuating conditions, but it can’t correct compromised metal or damaged coatings. Elite Restomods offers climate-controlled vehicle storage, including basic maintenance checks and battery tending.
Rust-related bodywork can also be planned within a broader custom build, where the condition of the body informs the work that follows. To see how that planning fits into a build, explore the custom build process.
Plan rust-related bodywork as part of a classic-car build
Rust findings help define more than the repair itself. They can affect which panels need attention, how much bodywork should happen before paint, and how that work fits alongside the build’s broader priorities. Treating corrosion as an early planning question keeps finish decisions grounded in the car’s actual condition, rather than the appearance of its exterior.
Document the car’s condition before defining the work
Start with a clear record of what’s visible: photograph each affected area, note its location, describe signs such as bubbling or staining, and identify previous repairs where known. Include suspected hidden areas as questions to resolve, not as confirmed damage. This gives the owner and build team a shared reference when discussing the scope.
That record is a starting point, not a final diagnosis. Removing trim, coatings, or other components during disassembly can expose corrosion that wasn’t visible during the first inspection. Update the notes as access improves, distinguishing what has been confirmed from what still needs assessment. A documented classic car rust repair process makes it easier to connect new findings to bodywork decisions and the build’s priorities.
Useful notes can include:
- Where corrosion is visible and what it looks like.
- Which areas may be concealed by trim, coatings, or earlier repairs.
- What changes after disassembly and closer inspection.
- How each finding relates to the owner’s goals for the car.
Balance preservation, finish, and modern usability
Every classic presents a balance between retaining its original character and preparing it for the way its owner wants to use it. A preservation-minded build may place particular importance on keeping original details, while a driver-focused restomod may prioritize considered repairs as part of a wider plan for a dependable, usable car. Neither goal changes the need to base metalwork on the body’s condition.
Discussing those priorities before finish work begins helps establish how rust-related bodywork fits with panel alignment, exterior finish, and other planned changes. Elite Restomods provides custom build services that include bodywork, so corrosion findings can be considered within the broader project rather than treated as an isolated cosmetic decision. The custom build services and process provide context for how bodywork can fit into that larger journey.
A thoughtful plan respects the lines and history of the car while making room for the owner’s vision. If you’re shaping a classic-car build, discuss your classic-car project with Elite Restomods.
Shape the next chapter of your classic
Rust findings can help clarify what you want the car to become. Before committing to a finish or broader build choices, decide which original details matter most, how you intend to use the vehicle, and where careful bodywork can support that vision. Those priorities give the project a stronger foundation than appearance alone.
The classic car rust repair process is part of a larger restoration story: preserving the character that drew you to the car while preparing it for the road ahead. Elite Restomods’ custom build services include bodywork, and the company specializes in fully sorted restomods. The goal is a considered build where craftsmanship serves both heritage and real-world enjoyment.
Your classic doesn’t have to remain a distant dream or a display piece. With a clear vision and thoughtful planning, it can become a vehicle you’re proud to drive and experience. Start a conversation about your classic-car build with Elite Restomods.
Frequently Asked Questions
Can you paint over rust on a classic car?
Not as a lasting repair. Paint may hide discoloration, but it doesn’t remove corrosion or replace metal that has thinned or disappeared. First assess the affected area and determine whether the metal is sound enough to prepare. A small chip exposing intact metal is different from bubbling paint that reveals flaky or deeply pitted steel. The finish should follow the appropriate repair, not serve as a cover for active corrosion.
How do you know whether classic-car rust is structural?
Holes, weakened metal, or corrosion near areas that support the body or chassis call for more than a cosmetic assessment. Rust around a floor, rail, or major joint may affect how the surrounding metal functions. Appearance alone can’t establish the full extent, especially when seams, coatings, or panels conceal damage. An in-person inspection, including access to affected areas where needed, helps define the repair scope; a photo can’t provide a definitive diagnosis.
Does a rust converter repair metal that has rusted through?
No. A converter isn’t replacement metal and can’t restore material lost through perforation or severe corrosion. Its suitability depends on the remaining surface and the manufacturer’s current directions, including any preparation requirements. If rust has created a hole or left a section too deteriorated to retain, the repair needs to address that damaged metal first. Primers and protective coatings come later; they don’t rebuild missing material.
Can classic-car rust come back after body repair?
Yes. Corrosion may return if affected metal remains, a vulnerable area is left exposed, or paint and protective coatings are chipped or deteriorate. No single treatment makes a car permanently rust-proof. Keep an eye on repaired panels and seams, maintain coatings according to their care instructions, and note new bubbling or staining early. Dry, controlled storage can support preservation, but it can’t replace sound body repair or ongoing checks.
What is the difference between rust removal and rust prevention treatment?
Rust removal takes corrosion off a surface; prevention protects suitably prepared metal from future exposure. Conversion products have a separate role: they treat remaining rust only when the product’s directions allow it. They aren’t equivalent to removing corrosion or replacing weakened metal. In the classic car rust repair process, the metal’s condition determines what comes first, while protection belongs after the surface and any damaged sections have been properly addressed.
Is surface rust on a classic car always repairable without replacing metal?
No. Light corrosion may be removable if enough sound metal remains, but pitting and corrosion depth can change what the repair requires. Calling a mark “surface rust” based on appearance doesn’t guarantee that cleaning alone will be enough. The affected area may need to be exposed and assessed more closely. That examination helps establish whether the metal can be retained or whether a deteriorated section needs replacement.
How should I store a classic car after rust repair?
Keep the car clean and dry, and avoid storing it where moisture can remain trapped against the body. Climate-controlled storage can help manage the environment, but it doesn’t make a vehicle rust-proof or correct an incomplete repair. Check repaired areas, seams, and coatings periodically, especially after driving in wet conditions. If you spot fresh staining, bubbling, or coating damage, record the location and have the area assessed before the problem advances.